

Introduction
If you would like to check out IV Infusion Compatibility Auto-Compiler, please click here.
A year ago, I built a web app called Enhanced Compat Mode that analyzed IV infusion compatibilities to devise the most efficient combinations across the fewest possible lines. I recently decided to rename it to something more intuitive: the IV Infusion Compatibility Auto-Compiler.
The app differentiates between two distinct clinical workflows:
Stacked Mode maximizes lumen efficiency by allowing incompatible secondary medications to share a line, provided they are each compatible with the primary infusion and scheduled to run sequentially. For example, a patient receiving vasopressin, potassium phosphate, and magnesium sulfate can share a lumen because the electrolytes run sequentially.
Separated Mode prioritizes safety for continuous drips, requiring all medications within a lumen to be mutually compatible and isolating incompatible drugs into different lines entirely.
The Problem: The Greedy Algorithm
In the original iteration, Stacked Mode worked well, but Separated Mode was unreliable. The culprit was a greedy algorithm.
Consider a patient on Vasopressin, Magnesium Sulfate, and Potassium Phosphate. Vasopressin is compatible with both, but the electrolytes are incompatible with each other. The optimal output is two lumens: Vasopressin paired with one electrolyte, while the other sits on its own line. However, the greedy algorithm consistently separated all three into isolated lines because an early, short-sighted pairing decision blocked the better arrangement.
The Pivot to Graph Theory
After a year of programming growth, I realized this is fundamentally a graph coloring problem. Each medication is a node, and edges connect incompatible drugs. The goal is to partition these nodes into the minimum number of "colors" (lumens) possible.
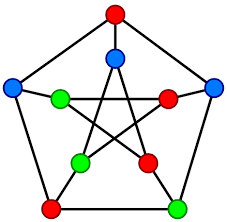
Source: Wikipedia
I ditched the guess-and-check approach for a backtracking algorithm. Instead of grabbing the first arrangement that looks okay, the app now explores the entire decision tree. It starts by aiming for the absolute minimum number of lumens and tries to slot each medication in while cross-checking everyone else in that group. When it hits a dead end, it backtracks and tries a different path. To make this efficient, I added a heuristic that sorts medications by their number of incompatibilities first. By tackling the "troublemakers" early, the algorithm kills off impossible combinations immediately.
I highly recommend Learning Functional Data Structures and Algorithms by Atul S. Khot and Raju Kumar Mishra if you are interested in reading more about this approach.
The "Rule of Three"
While the backtracking algorithm is capable of organizing up to five medications per line, the Auto-Compiler strongly suggests a maximum of three continuous infusions. This is rooted in two critical clinical constraints:
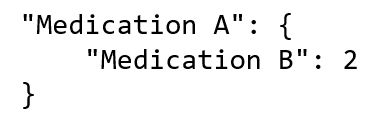
The Lack of Transitive Property: In clinical chemistry, if Drug A is compatible with B, and B is compatible with C, it does not guarantee A, B, and C can coexist. Most data is binary (1:1 testing), which cannot account for the "cocktail effect" where cumulative pH shifts cause a drug to precipitate (Keum et al., 2024).
Manifold Dead-Space Volume: Dead space is the stagnant fluid trapped in connectors and Y-sites. In complex manifolds, this becomes a reservoir for concentrated, high-alert medications. As you add infusions, you increase the risk of accidental bolusing and delivery lag; if a carrier rate is adjusted, that trapped volume of vasopressors is suddenly shunted into the patient (Lovich et al., 2013).
UI and Functional Updates
I’ve also updated the UI. Stacked Mode now treats secondaries as strictly sequential, removing the "max medications" limit for that mode. I also implemented a context-aware dynamic carrier fluid placeholder. This visually represents the primary saline infusion required for piggybacks, automatically injecting a "Normal Saline Primary" label into any lumen grouping containing a secondary.
Conclusion
Revisiting this project a year later has been a lesson in how software, much like clinical practice, is rarely a "finished" product. Identifying the flaws in my original logic and implementing a backtracking algorithm wasn't just a bug fix; it was about maturing the tool to match the actual complexity of my job. This evolution highlights that our programs should grow alongside our expertise—an iterative process that reflects growth as both a developer and a clinician.
References
Cassano-Piché, A., Fan, M., Sabovitch, S., Masino, C., Easty, A. C., Health Technology Safety Research Team, & Institute for Safe Medication Practices Canada (2012). Multiple intravenous infusions phase 1b: practice and training scan. Ontario health technology assessment series, 12(16), 1–132.
Lovich, M. A., Wakim, M. G., Wei, A., Parker, M. J., Maslov, M. Y., Pezone, M. J., Tsukada, H., & Peterfreund, R. A. (2013). Drug infusion system manifold dead-volume impacts the delivery response time to changes in infused medication doses in vitro and also in vivo in anesthetized swine. Anesthesia and analgesia, 117(6), 1313–1318. https://doi.org/10.1213/ANE.0b013e3182a76f3b
Keum, N., Yoo, J., Hur, S., Shin, S. Y., Dykes, P. C., Kang, M. J., Lee, Y. S., & Cha, W. C. (2024). The potential for drug incompatibility and its drivers - A hospital wide retrospective descriptive study. International journal of medical informatics, 191, 105584. https://doi.org/10.1016/j.ijmedinf.2024.105584


